Recharge
.png)
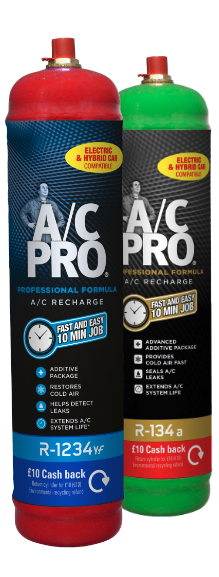
R-1234YF Auto Air-Con
Helps restore A/C cooling by replacing refrigerant and oil lost in R-1234YF auto air-con systems. Specially formulated with an additive package that contains PAG oil and UV dye to assist with detecting leaks and extend A/C system life. For R-1234YF A/C systems only.
- Replenishes lost refrigerant gas
- Helps extend A/C System Life
- Includes UV dye, helps detect and locate leaks in metal and rubber components
- Includes PAG Oil
- Fast and easy 10 minute job
- Electric & hybrid car compatible
.png)
R-134A Auto Air-Con Recharge
Helps top up lost refrigerant to restore cold air to R-134A auto air-con system. Formulated with an advanced, patented additives package to help lubricate and seal common leaks, this 10 minute A/C recharge job is as simple as the rest of your car maintenance. For R-134A A/C systems only.
- Top up refrigerant gas for R-134A A/C Systems
- Fast and easy 10 minute job
- Helps extend A/C System life
- Seals A/C Leaks
- Electric & hybrid car compatible
TRIGGERS & GAUGES
.png)
R-1234YF Reusable Trigger & Gauge
Helps to accurately measure refrigerant pressure and recharge R-1234YF A/C Systems. It can be used independently, without connecting to a gas canister, to check refrigerant pressure and includes an extra long, heavy duty hose for easier access to hard-to-reach ports. For R-1234YF A/C Systems only.
- Provides accurate pressure reading and fill
- 24” braided charging hose gives easier access to hard-to-reach ports
- Metal coupler only connects to low side ports in R-1234YF systems
- Can be used independently without connecting to canister
.png)
R-134A Advanced Digital Gauge
Makes checking refrigerant levels and topping up your auto air-con system even easier. The digital display includes pressure readings and the corresponding instructions to eliminate guesswork and cross-referencing to PSI charts.
- Eliminates guesswork and cross-referencing associated with analog gauges
- Self-guided instructions
- Displays the PSI level accompanied by the relevant command
- Includes a charging progress indicator to advise when a top up is completed
.png)
R-134A Reusable Trigger & Gauge
Accurately charges and measures A/C refrigerant levels. It can be used independently, without connecting to a gas canister, to check refrigerant pressure and includes a colour coded calibration for easy use. For R-134A A/C systems only.
- Provides accurate pressure reading and fill
- 24” braided charging hose gives easier access to hard-to-reach ports
- Fool proof metal coupler only connects to low side ports in R-134A systems
- Can be used independently without connecting to canister
ACCESSORIES
.png)
Certified QC-2HD R-134A Professional Measure
An auto A/C trigger dispenser and gauge made for professionals. Designed with a steel braided hose for heavy-duty use, this reusable trigger and gauge allows for fast and accurate charging of R-134A A/C systems.
- Provides accurate pressure reading and fill
- Extra-long steel braided hose for heavy duty use
- Can be used independently without connecting to canister
.png)
R-134A Super Seal Air-Con Stop Leak
Helps repair minor metal and rubber leaks in R-134A auto air-con systems. The formula contains chemicals that are activated by moisture to form a patch over the leak as the refrigerant passes through.
- Repairs metal leaks – evaporator, condenser, compressor, accumulator, receiver/dryer
- Seals rubber leaks – O-ring, gasket, hoses
- Does not contain R-134A gas
.png)
R-1234YF Super Seal Air-Con Stop Leak
Helps repair minor metal and rubber leaks in R-1234YF auto air-con systems. The formula contains chemicals that are activated by moisture to form a patch over the leak as the refrigerant passes through.
- Repairs metal leaks – evaporator, condenser, compressor, accumulator, receiver/dryer
- Seals rubber leaks – O-ring, gasket, hoses
- Does not contain R-1234YF gas

AUTO AIR-CON CLEANER
Over time, your air-conditioning system can be contaminated by bacteria. This build up leads to bad odours and poor air flow. A/C PRO® Auto Air-Con Cleaner can help clean and refresh your entire A/C system in just 10 minutes, leaving it clean and fresh.
- Cleans and refreshes
- Eliminates odours and bacteria
- Fast and easy job
- Works in 10 minutes
- Fresh scent
- Simple ‘Lock & Leave’ function
.png)
test thermometer
Use A/C PRO® Test Thermometer to measure vent temperatures and evaluate your auto A/C performance. Designed with a magnified dial for easy readability. Measures 0 – 100°C.
- Checks temperature in A/C duct outlets & surroundings
- Magnified dial
- Temperature Range 0 – 100°C
- Compatible with all A/C systems

FOR USE WITH A/C PRO® R-1234YF AIR-CON REUSABLE TRIGGER & GAUGE (AC00093EN).
 Compatible with STP® YF Air-Con Reusable Trigger & Gauge (ST00093EN)
 Electric & hybrid car compatible
How to use:
- Find port and remove cap - Do not start the engine. Always connect and disconnect the coupler of the trigger dispenser with engine off. Locate vehicle A/C low-side service port and remove protective dust cap. The low-side port is located on the larger diameter aluminium tubing, between the evaporator and compressor. Wearing goggles & gloves, connect the coupler by pressing it onto the low-side service port. DO NOT FORCE. Disconnect the coupler from the low-side port. NOTE: If the reading is zero, this indicates there may be an abnormal leak in the system. DO NOT ATTEMPT TO ADD REFRIGERANT. SEEK PROFESSIONAL ADVICE.
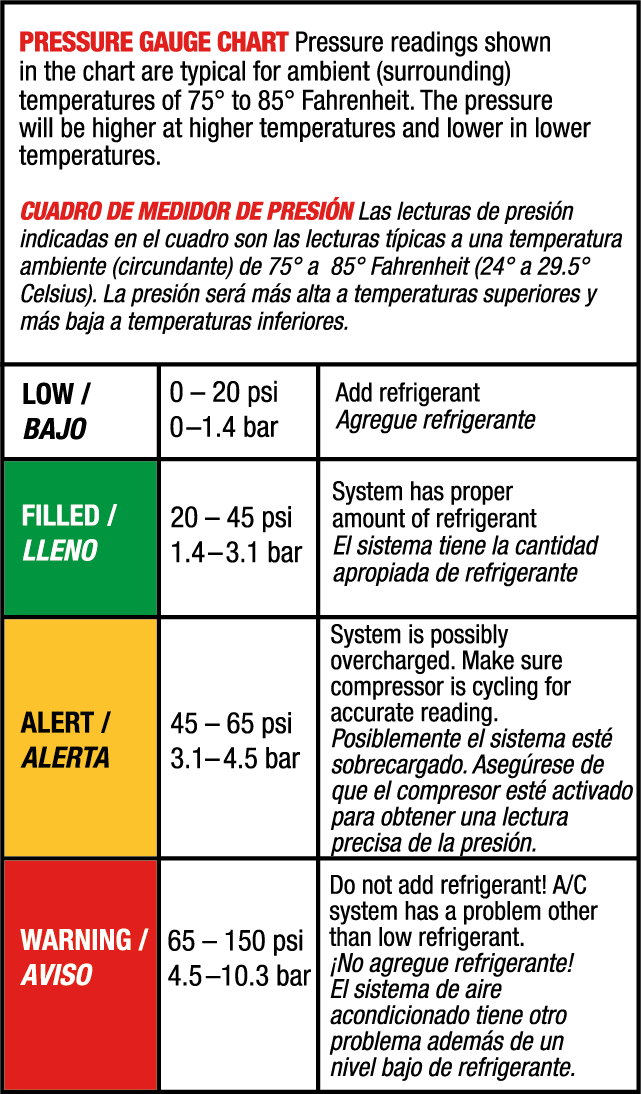
- Measure - Prepare product for use by removing valve protection cap and attaching the gauge. THIS PRODUCT HAS A LEFT-HANDED THREAD. THIS MEANS YOU WILL TURN COUNTERCLOCKWISE TO TIGHTEN. DO NOT OVERTIGHTEN. FLAMMABLE GAS. KEEP AWAY FROM HOT SURFACES (EXHAUST MANIFOLD, ETC). DO NOT SMOKE. Connect the coupler by pressing it onto the low-side service port. Start engine and set A/C to max cool with system on re-circulate. Allow to run for 3 minutes and ensure the air conditioner’s compressor is running and clutch is engaging. Check gauge reading without pressing the trigger and refer to the pressure gauge chart below for diagnosis. If PSI reading is in the white sector (5-25 psi), charge the system. Using a thermometer can be helpful. Simply place in the central dashboard vent inside the vehicle and note the reading.
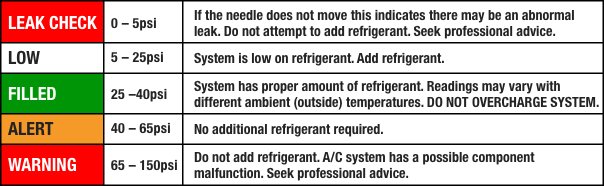
- Charge - Squeeze the trigger to dispense can contents. Look and listen for the sound of an abnormal leak. IF AN ABNORMAL LEAK IS FOUND STOP ADDING REFRIGERANT. Hold can upright to charge and rotate between 12 o’clock to 3 o’clock, continually agitating (shaking). Continue process, releasing the trigger every 10-15 seconds to check system pressure against pressure gauge chart, until gauge reads FILLED (green sector - system has the correct amount of charge). A thermometer reading of below 15°C indicates system is charged. During the charging step, system pressure readings should be taken when the compressor is running. DO NOT OVERCHARGE. IMPORTANT: ALWAYS WEAR GLOVES AND SAFETY GOGGLES.

For use with A/C PRO® R-1234YF Auto Air-Con Recharge (AC00090EN)
Compatible with STP® YF Air-Con Recharge (ST00090EN)
How to use:
- Find port and leak check - Do not start the engine. Always connect and disconnect with engine off. Locate the A/C low-side service port. You will not be able to connect the high-side port in error. Unscrew the dust cap and connect the coupler of the trigger dispenser. If reading is zero, this indicates there may be an abnormal leak in the system. DO NOT ATTEMPT TO ADD REFRIGERANT. SEEK PROFESSIONAL ADVICE.
- Turn the engine on – set the A/C to maximum cooling. Activate recirculation mode and allow to run for 3 minutes. Ensure the air conditioner’s compressor is running and clutch is engaging.
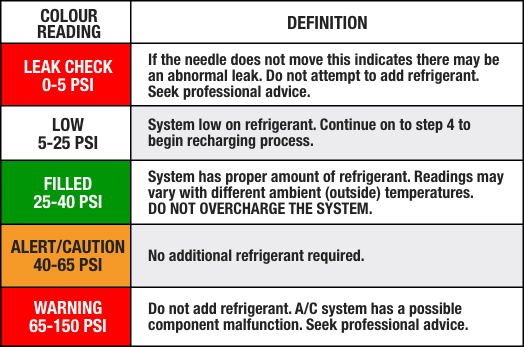
- Without pressing the trigger, take a pressure reading. Refer to chart below for next step.
- Disconnect the coupler from the low-side port, screw the gauge onto a A/C PRO® R-1234YF A/C Recharge canister ANTI-CLOCKWISE and push the coupler onto the vehicle low-side service port. Ensure the engine is off when disconnecting/reconnecting the coupler from the low-side port.
- If the pressure chart suggests that you need to add refrigerant to the A/C system, start the engine, turn the A/C on high and activate recirculation mode. Shake the can and squeeze the trigger while rotating the can from the 12 to 3 o’clock position.
- Check the pressure every 10–15 seconds by releasing the trigger. Charging is complete when the needle is in the green zone. BE CAREFUL NOT TO OVERCHARGE YOUR SYSTEM. Do not let the needle past the green zone.
IMPORTANT: ALWAYS WEAR GLOVES AND SAFETY GOGGLES WHEN RECHARGING YOUR SYSTEM.
Keep out of reach of children.
For use with A/C PRO® R-134A Auto Air-Con Recharge (AC02001EN)
Compatible with STP® Auto Freeze Air -Con Recharge (ID02000EN) and STP® EZ CHILL Auto Air-Con Recharge (ID02001EN)
How to use:
- Find port - Do not start the engine. Always connect and disconnect with engine off. Locate the A/C low-side service port. Use the port locator on this website for help finding the low-side port. You will not be able to connect to the high side port in error Unscrew the dust cap and connect the trigger dispenser. If reading is zero, this indicates there may be an abnormal leak on the system. DO NOT ATTEMPT TO ADD REFRIGERANT. SEEK PROFESSIONAL ADVICE.
- Measure - Start the engine. Set A/C to maximum cooling and allow to run for 3 minutes. Check that the A/C compressor is running by either listening or watching that the clutch is engaged. Check the gauge reading and refer to chart below:
- Charge - Remove coupler from port with engine switched off. Screw container into trigger dispenser – do not overtighten. Follow detailed instruction on recharge container. Reconnect the coupler to the low-side port and restart the engine. Squeeze the trigger to charge to the level shown on chart below. Release trigger every 10-15 seconds to check pressure. IMPORTANT: ALWAYS WEAR GLOVES AND SAFETY GOGGLES WHEN RECHARGING YOUR SYSTEM.
Keep out of reach of children.
For use with A/C PRO® R-134A Auto Air-Con Recharge (AC02001EN)
Compatible with STP® Auto Freeze Air-Con Recharge (ID02000EN) and STP® EZ CHILL Auto Air-Con Recharge (ID02001EN)STP Auto Freeze Air-Con Recharge (ID02000EN)
How to use:
- Find port & leak check - Do not start the engine. Always connect and disconnect with engine off. Locate the A/C low-side service port – Use the port locator on this website for help finding the low-side port. You will not be able to connect to the high side port in error. Unscrew the dust cap and connect the trigger dispenser. If reading is zero, this indicates there may be an abnormal leak on the system. DO NOT ATTEMPT TO ADD REFRIGERANT. SEEK PROFESSIONAL ADVICE.
- Measure - Start the engine. Set A/C to maximum cooling and allow to run for 3 minutes. Check that the A/C compressor is running, listening and watch the clutch engaging. Check the gauge reading and compare to chart below:
- Charge - Remove coupler from port with engine switched off. Screw container into trigger dispenser – do not overtighten. Follow detailed instructions on A/C PRO® recharge container. Reconnect the coupler to the low-side port and restart the engine. Squeeze the trigger to charge to the level shown on chart below. Release trigger every 10-15 seconds to check refrigerant level. IMPORTANT: ALWAYS WEAR GLOVES AND SAFETY GOGGLES WHEN RECHARGING YOUR SYSTEM.
Keep out of reach of children.
A/C PRO® CERITFIED QC-2HD R-134A PROFESSIONAL MEASURE
A/C PRO® R-134A Auto Air-Con Recharge (AC02001EN), STP® Auto Freeze Air-Con Recharge (ID02000EN) and STP® EZ CHILL Auto Air-Con Recharge (ID02001EN)STP Auto Freeze Air Con Recharge (ID02000EN)
How to use:
- Find port - Locate the low-pressure port of the A/C system. Unscrew the dust cap.
- Measure - Start engine and set A/C to maximum cooling. Connect Charging Gun to the low-pressure port. Check the pressure and refer to the chart below
- Fill - Remove coupler from port. Screw R-134A refrigerant can into Charging Gun. Reconnect coupler to the low-pressure port. Squeeze the trigger to charge. Release trigger to check refrigerant level
IMPORTANT: ALWAYS WEAR GLOVES AND SAFETY GOGGLES WHEN RECHARGING YOUR SYSTEM.
Keep out of reach of children.
R-134A SUPER SEAL AIR-CON STOP LEAK
 Not for use in hybrid/electric vehicles with non-belt driven (electric driven) compressor. For R-134A air conditioning systems only.
How to use:
- Start engine and set the air conditioner to maximum cooling with system on re-circulate. Allow to run for 3 minutes. Ensure the air conditioner’s compressor is running and clutch is engaging.
- Turn air conditioner & engine off.
- Turn the valve handle of the recharge hose counter-clockwise until the piercing stem is in the up position. This will prevent the accidental piercing of the Super Seal Can. Caution: do not add A/C PRO® Super Seal through a manifold gauge & hose set. Use only enclosed recharge hose.
- Carefully screw the top of the Super Seal can onto the end of the recharge hose with the valve hand.
- Locate vehicle air conditioner low-side service port and remove protective dust cap. The low-side port is located on larger diameter aluminium tubing, between the evaporator and compressor. For further help use the port locator on this website for help finding the low-side port.
- With air conditioner switched off and whilst wearing goggles & cloth-lined gloves, pull back sleeve on quick–coupler and attach by pressing onto low-side port. Coupler will only fit low-side port – do not force. Make sure fitting is tight. DO NOT ATTEMPT TO CONNECT TO THE HIGH-SIDE PORT AS THE PRESSURE MAY CAUSE THE CAN TO BURST, RESULTING IN SERIOUS INJURY.
- Holding the can right side up, turn the valve handle on the recharge hose clockwise until the piercing stem has punctured the Super Seal Can.
- Turn the valve handle counter-clockwise, until you hear the refrigerant moving from the car air conditioning system into the Super Seal can.
- Wait 10 seconds and turn valve handle clockwise to close valve.
- Do not remove the can, but shake the can to allow refrigerant to mix with A/C PRO® Super Seal.
- Start engine and set air conditioning to maximum cooling with system on re-circulate.
- Holding the can in an upside-down position and above the service port, turn the valve counter-clockwise. Shake lightly until can is empty.
- Disconnect the recharge hose from the low-side service port. Ensuring there is no residue in the can, disconnect the can from the recharge hose. Turn the valve handle on the recharge hose until the piercing stem is in the up position. Discard can and hose in accordance with national regulations.
- To prevent A/C PRO® Super Seal from sealing the service port, immediately flush the charging port with A/C PRO® R-134A recharge product.
- Allow the air conditioning system to run for 15 minutes to let the Super Seal and refrigerant circulate.
R-1234YF Super Seal Air-Con Stop Leak
Not for use in hybrid/electric vehicles with non-belt driven
(electric driven) compressor.
How to use:
- Start engine and set the air conditioner to maximum cooling with system on re-circulate. Allow to run for 3 minutes. Ensure the air conditioner’s compressor is running and clutch is engaging. If not, use A/C PRO® R-1234YF recharge product and top up the system.
- Turn air conditioner & engine off.
- Turn the valve handle of the recharge hose counter-clockwise until the piercing stem is in the up position. Caution: do not add A/C PRO® Super Seal through a manifold gauge & hose set. Use only enclosed recharge hose.
- Carefully screw the top of the Super Seal can onto the end of the recharge hose with the valve hand. Please note: The can and hose use a reverse thread fitting, so you will be screwing it toward the left.
- Locate vehicle air conditioner low-side service port and remove protective dust cap. The low-side port is located on larger diameter aluminium tubing, between the evaporator and compressor. For further help use the port locator on this website for help finding the low-side port.
- With air conditioner switched off and whilst wearing goggles & cloth-lined gloves, pull back sleeve on coupler and attach by pressing onto low-side port. Coupler will only fit low-side port – do not force. Make sure fitting is tight. DO NOT ATTEMPT TO CONNECT TO THE HIGH-SIDE PORT AS THE PRESSURE MAY CAUSE THE CAN TO BURST, RESULTING IN SERIOUS INJURY.
- Holding the can upright, turn the valve handle on the recharge hose clockwise all the way in. You will hear refrigerant moving from the vehicle’s A/C into the can.
- Wait 10 seconds and turn valve handle clockwise to close valve.
- Keeping the can connected, shake the can to allow refrigerant to mix with A/C PRO® Super Seal.
- Start engine and set air conditioning to maximum cooling with system on re-circulate.
- Holding the can in an upside-down position and above the service port, turn the valve counter-clockwise. Shake lightly until can is empty.
- Disconnect the recharge hose from the low-side service port. Turn the valve handle counter-clockwise on the hose until the pushing stem is in the up position. Unscrew can from hose and discard. Be careful of residual oil that may leak out of the hose. Discard can and hose in accordance with national regulations.
- To prevent A/C PRO® Super Seal from sealing the service port, immediately flush the charging port with A/C PRO® R-1234YF recharge product.
- Allow the air conditioning system to run for 15 minutes to let the Super Seal and refrigerant circulate.
AUTO AIR-CON CLEANER
 Cleans and refreshes the
entire A/C system in 10 minutes
How to use:
- Shake well before use. Start engine and set A/C onto internal circulation at full power. Open all vents and close all the windows.
- Ensure front passenger seat is pushed and tilted as far forward as possible. Place can on the floor or a flat surface, two thirds from front passenger seat, with nothing obstructing the spray pattern.
- Activate the can by pressing down on the valve.
- Close the door and make sure all windows are also closed.
- Wait 10 minutes until the can is empty. Then switch off the A/C system and engine.
- Open all doors and windows to ventilate the vehicle.
For best results, remove any sources of unwanted odours. Park car outside in cool, shady location.
TEST THERMOMETER
How to use:
- Park car in shade when checking temperature.
- Start engine and allow to run at a fast idle.
- Turn air conditioning to MAX cool.
- Insert full length of probe into the centre A/C vent.
- Allow approximately 5 minutes for accurate reading.
- Readings of below 15°C indicate a properly charged system.

Refundable Recycling & Refilling Deposit
With each purchase of A/C PRO® R1234YF Air-Con Recharge and R134A Auto Air-Con Recharge you are entitled to £10 cashback. Simply return the empty canister to the store you purchased the product, ensuring you present your receipt or proof of purchase.
Terms & Conditions ApplyTERMS & CONDITIONS
- The A/C PRO® £10 Cash Back Customer Deposit/Return/Collection scheme (the “Scheme”) is run by Energizer whose registered office address is Sword House, Totteridge Road, High Wycombe, HP13 6DG.
- The Scheme is run to encourage consumers who no longer need their A/C PRO® Air Conditioning container (“Cylinder”) to return them for recycling and refilling.
- Consumers will be required to pay a £10.00/€10.00 deposit at the time of purchase and must return their used Cylinder, together with proof of purchase, to the store where they purchased the Cylinder in order to receive their full £10.00//€10.00 deposit refund.
- No time limits will be placed on the return.
- Energizer reserves the right to amend these terms and conditions at any time without notice, if, in Energizer’s opinion, events or circumstances occur which are outside its control.
- In case of a dispute Energizer’s decision is final. No correspondence will be entered into.
- Purchase of a Cylinder shall be deemed acceptance of these terms and conditions.
- This Scheme is run in compliance with EC Regulation No 517/2014 and GB Fluorinated Greenhouse Gases Regulations 2015.
For more information on the STP® Air-Con Portfolio, or for help locating your vehicle’s Low Side Port, please click on the links below.